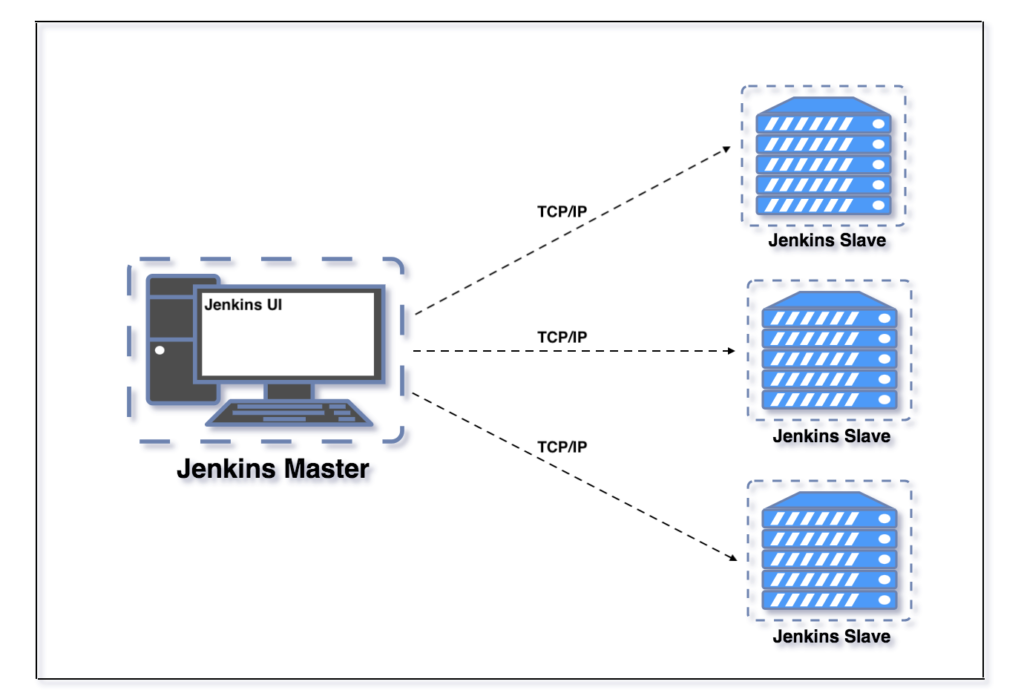
Jenkins architecture consists primarily of two elements, Jenkins master andSlaves.
Jenkins Master:
Jenkins master contains key configuration like Plugins, Jobs, Users, Global Security, Logs and more. It uses TCP/IP connection protocol to communicate with slaves.
JenkinsSlave:
Jenkins slave is java executable which runs on remote machines and it will get Jenkins master’s directions for running various jobs on it. Slaves can be configured on any type of Operating Systems like Linux, Windows, MacOS etc.
Master and Slaves setup
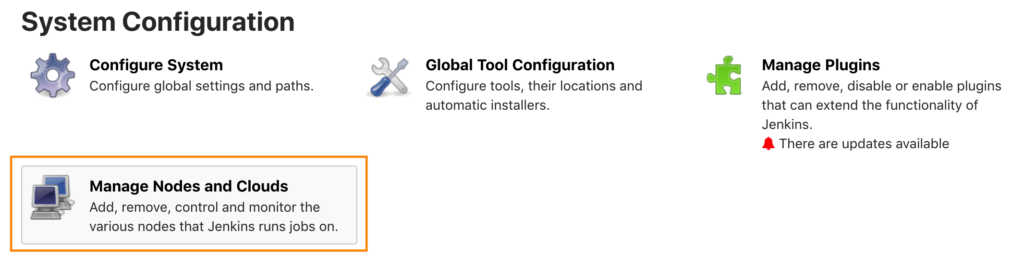
Configuration of Jenkins Slaves can be achieved by going to “Manage Jenkins” section and selecting “Manage Nodes and Clouds” under “System Configuration”.
Manage Jenkins —> System Configuration —> Manage Nodes and Clouds
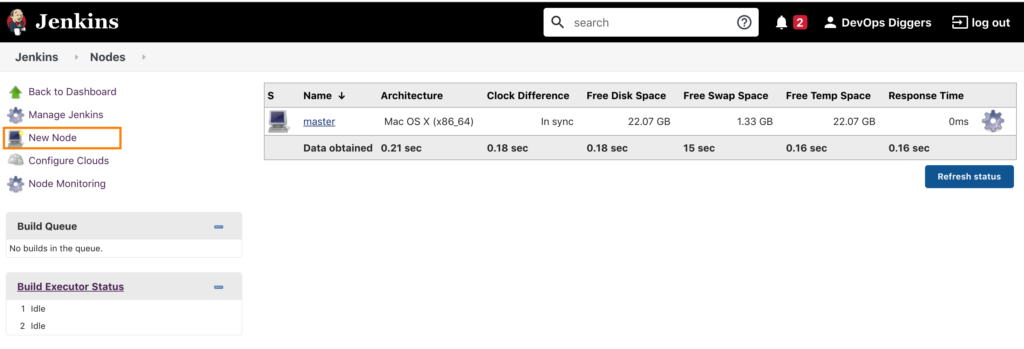
On the “Manage Nodes and Clouds“, select the “New Node” on the left side of the dashboard.
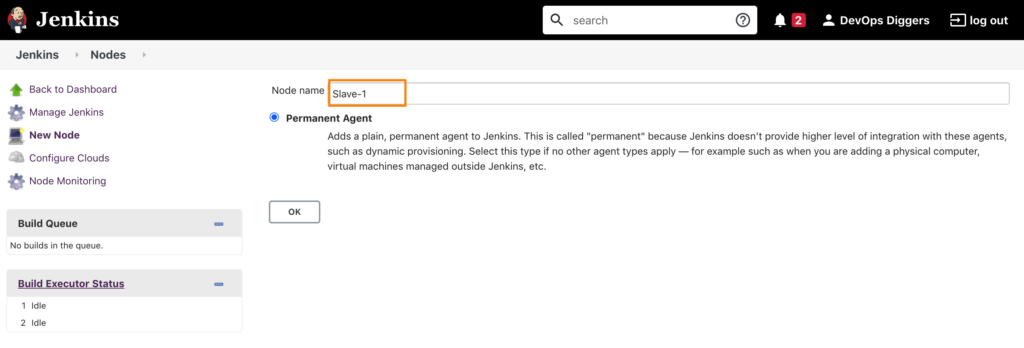
Give the Node name as you wish and select the Permanent Agent option and click “OK“.
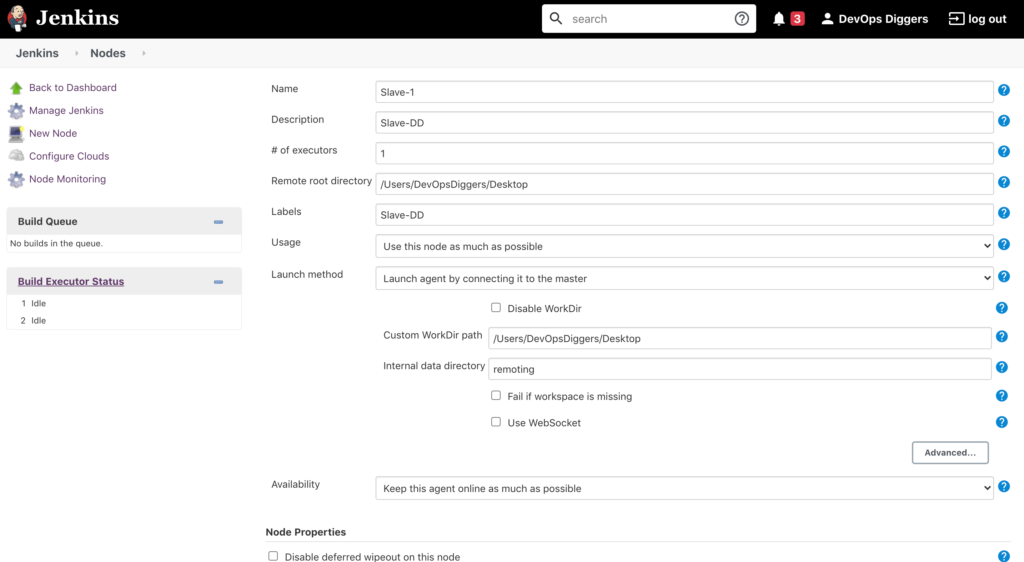
It will lead to the section where we can provide specific information.
Name: Give the same name you gave in the previous section while creating the node.
Description – Any description that you would like to give to this node.
# of executors – Provide the number of executors you want to add to that node.
Remote root directory – Provide the root directory path of the remote machine (Since this is the demo intent, both master and slaves will only be configured in the local machine. An empty directory got created in the local desktop).
Labels: Labels get assigned in the Jenkins builds to run the jobs on slaves . So please include your preferred label name.
Usage : There will be 2 choices to choose from in this section. The choice “Use this node as much as possible” is selected here.

Launch method: There will be various types of options in this section to be chosen to be able to connect the agent to the master.

Custom Workdir path:This path may be the same as the “Remote root directory path”
Internal data directory: remoting
Availability:There will be different choices to choose from in this section to scale up and scale down the slaves.

After filling in all the areas, click on “Save.”
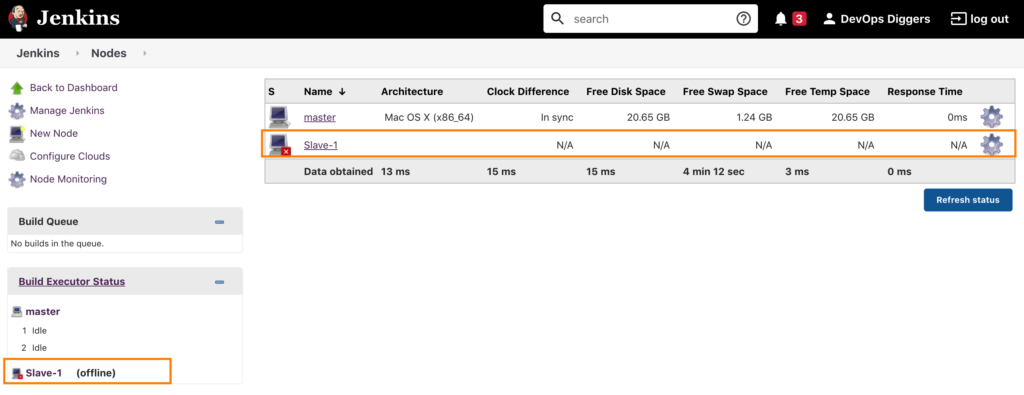
Now we could see that Jenkins slave has been configured but there is still not connected to master. You can check the same thing by looking at the “red x” on slave.
Clicking on the newly formed slave, we could see various options for connecting the agent with Jenkins master.
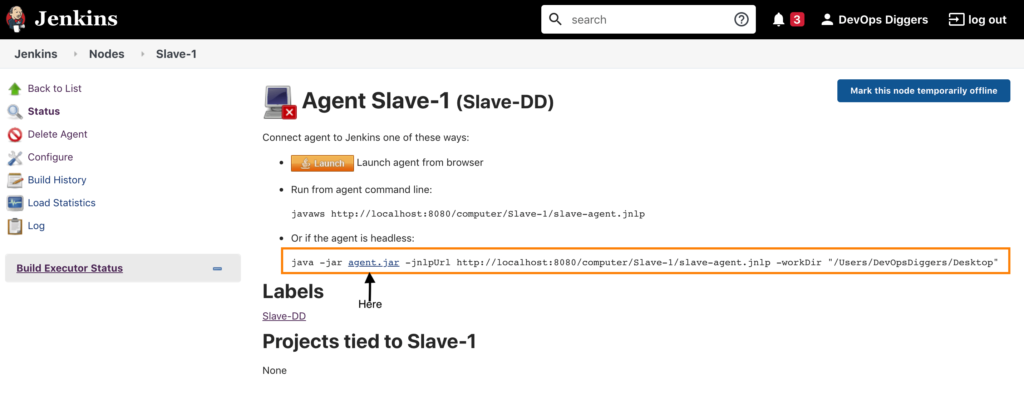
The selected option in this scenario is to execute the command as highlighted in the above image.
Before running the command, the “agent.jar” (Mentioned in the same command) must be downloaded and saved in any preferred location, and the agent.jar ‘s path must be specified while running the command.
In this scenario, agent.jar gets copied to the local machine’s desktop and hence, run the command from the desktop path itself.
DD:Desktop DevOpsDiggers$ java -jar agent.jar -jnlpUrl http://localhost:8080/computer/Slave-1/slave-agent.jnlp -workDir "/Users/DevOpsDiggers/Desktop"
Jul 27, 2020 10:31:57 AM org.jenkinsci.remoting.engine.WorkDirManager initializeWorkDir
INFO: Using /Users/DevOpsDiggers/Desktop/remoting as a remoting work directory
Jul 27, 2020 10:31:57 AM org.jenkinsci.remoting.engine.WorkDirManager setupLogging
INFO: Both error and output logs will be printed to /Users/DevOpsDiggers/Desktop/remoting
Jul 27, 2020 10:31:57 AM hudson.remoting.jnlp.Main createEngine
INFO: Setting up agent: Slave-1
Jul 27, 2020 10:31:57 AM hudson.remoting.jnlp.Main$CuiListener <init>
INFO: Jenkins agent is running in headless mode.
Jul 27, 2020 10:31:57 AM hudson.remoting.Engine startEngine
INFO: Using Remoting version: 4.3
Jul 27, 2020 10:31:57 AM org.jenkinsci.remoting.engine.WorkDirManager initializeWorkDir
INFO: Using /Users/DevOpsDiggers/Desktop/remoting as a remoting work directory
Jul 27, 2020 10:31:58 AM hudson.remoting.jnlp.Main$CuiListener status
INFO: Locating server among [http://localhost:8080/]
Jul 27, 2020 10:31:58 AM org.jenkinsci.remoting.engine.JnlpAgentEndpointResolver resolve
INFO: Remoting server accepts the following protocols: [JNLP4-connect, Ping]
Jul 27, 2020 10:31:58 AM hudson.remoting.jnlp.Main$CuiListener status
INFO: Agent discovery successful
  Agent address: localhost
  Agent port:    64888
  Identity:      e3:74:75:54:ec:88:5c:65:5f:43:fd:62:44:6c:ef:9e
Jul 27, 2020 10:31:58 AM hudson.remoting.jnlp.Main$CuiListener status
INFO: Handshaking
Jul 27, 2020 10:31:58 AM hudson.remoting.jnlp.Main$CuiListener status
INFO: Connecting to localhost:64888
Jul 27, 2020 10:31:58 AM hudson.remoting.jnlp.Main$CuiListener status
INFO: Trying protocol: JNLP4-connect
Jul 27, 2020 10:31:58 AM hudson.remoting.jnlp.Main$CuiListener status
INFO: Remote identity confirmed: e3:74:75:54:ec:88:5c:65:5f:43:fd:62:44:6c:ef:9e
Jul 27, 2020 10:31:58 AM hudson.remoting.jnlp.Main$CuiListener status
INFO: Connected
WARNING: An illegal reflective access operation has occurred
WARNING: Illegal reflective access by org.jenkinsci.plugins.envinject.service.EnvInjectMasterEnvVarsSetter to field java.lang.reflect.Field.modifiers
WARNING: Please consider reporting this to the maintainers of org.jenkinsci.plugins.envinject.service.EnvInjectMasterEnvVarsSetter
WARNING: Use --illegal-access=warn to enable warnings of further illegal reflective access operations
WARNING: All illegal access operations will be denied in a future release
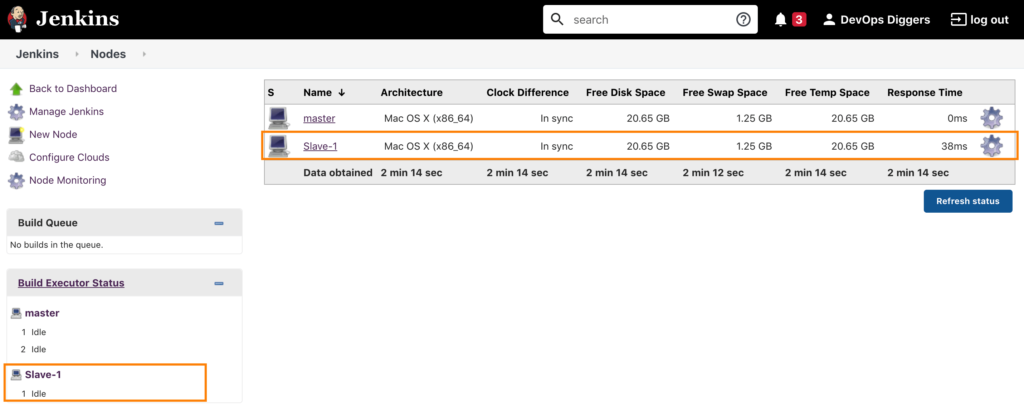
After we ran the above procedure successfully, we can see that the slave is now available and we could also see executors status in the left side corner.